Table of Contents
Gamers are always looking for new ways to enhance their gaming experience, and what better way to do that than to construct your very own homemade game controller? The Arduino Leonardo is an excellent microcontroller that can be used to build custom game controllers. In this blog post, we will show you how to build a simple game controller using an Arduino Leonardo and a few basic components.
Materials needed:
- Arduino Leonardo
- Breadboard
- Joystick
- Buttons (at least 4)
- Jumper wires
- USB cable
Step 1: Setting up the Joystick.

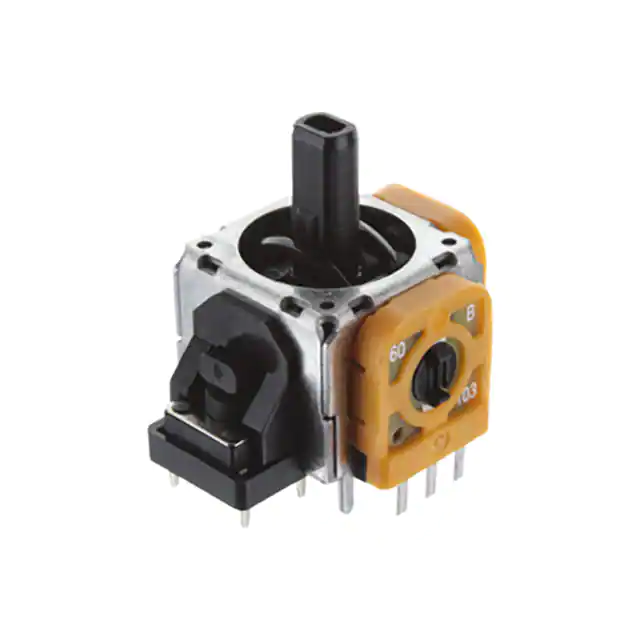
The first step in building our homemade game controller is to set up the joystick. The joystick will be used to control the movement of your game character. To do this, we need to connect the joystick to the breadboard. Assuming you are using a typical analog thumbstick like the one pictured above on the joystick, you will find usually two potentiometers.
One for the X-axis and one for the Y-axis. Connect the pin on one end of the potentiometer to 5v the middle pin to analog pin A0 and the other pin to ground. Now do the same thing for the other potentiometer except the middle pin on this one will go to analog pin A1 on the Arduino Leonardo.
Later if your axis won’t calibrate right you may need to swap the ground and 5v pins on one of the potentiometers. Most potentiometers have the wiper or variable out put on the middle pin but not always. If you when you try to calibrate your controller one or both axis don’t move and are pegged out, you may be dealing with an older or some off brand Chinese special potentiometer where the wiper is on one end with either 5v or ground on the middle pin. In this case you’ll have to take a multimeter and see on which pin the resistance changes when you move the stick.
Step 2: Adding Buttons
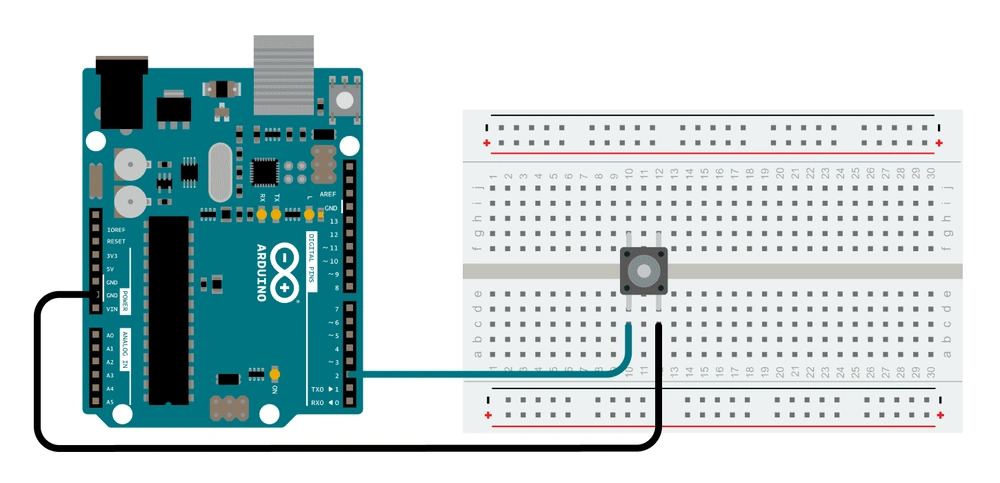
Next, we will add buttons to the controller. Buttons can be used to perform various actions in the game, such as jumping, shooting, etc. Connect each button to a different digital pin on the Arduino Leonardo. In this example, we will use digital pins 2, 3, 4, and 5.
The joystick library calls for the buttons to be normally high so you will connect one pin on the button to ground and the other to the digital pin as shown below. We’ll be using the internal pullup resistor so no need to add one in the circuit.

Step 3: Writing the Code
Once the hardware is set up, it’s time to write the code that will make our game controller work. The code will read the values from the joystick and buttons and send the information to the computer over USB.
#define joystickX A0
#define joystickY A1
#define button1 2
#define button2 3
#define button3 4
#define button4 5


void setup() {
  // set button pins as inputs
  pinMode(button1, INPUT_PULLUP);
  pinMode(button2, INPUT_PULLUP);
  pinMode(button3, INPUT_PULLUP);
  pinMode(button4, INPUT_PULLUP);
  // start the serial connection
  Serial.begin(9600);
}

void loop() {
  // read the values from the joystick
  int xValue = analogRead(joystickX);
  int yValue = analogRead(joystickY);
  // read the values from the buttons
  int button1Value = digitalRead(button1);
  int button2Value = digitalRead(button2);
  int button3Value = digitalRead(button3);
  int button4Value = digitalRead(button4);
  // send the values over USB
  Serial.print(xValue);
  Serial.print(",");
  Serial.print(yValue);
  Serial.print(",");
  Serial.print(button1Value);
  Serial.print(",");
  Serial.print(button2Value);
  Serial.print(",");
  Serial.print(button3Value);
  Serial.print(",");
  Serial.println(button4Value);
  // wait a little bit before reading the values again
  delay(10);
}
Here is a link to the GitHub repository for the Arduino Joystick Library. There you can see the documentation with many additional functions this library is capable of.
Step 4: Testing the Controller
Once the code is uploaded to the Arduino Leonardo, it’s time to test the controller. To do this, open the Serial Monitor in the Arduino IDE and set the baud rate to 9600. You should see the values from the joystick and buttons being printed in the Serial Monitor. You can use this information to control your game.
Conclusion
Building a homemade game controller is a fun and rewarding project that allows you to enhance your gaming experience. By using an Arduino Leonardo and a few basic components, you can create a custom game controller that is tailored to your needs. Whether you are a beginner or an experienced maker, building a homemade game controller is a great way to learn about electronics, programming, and game development.
See here for a free and open-source way of using your smartphone as a DIY Game Controller?
Here’s an introduction to the Arduino Leonardo and Joystick library

[…] Logitech 3D Extreme Pro Hall Effect Sensor Conversion Homemade Game Controller using an Arduino Leonardo […]
[…] Here’s another post about making a rudimentary joystick with an Arduino Leonardo. […]
[…] here but we do make up for it with our use of the Arduino Leonardo and Pro Micro boards. You can make a rudimentary video game controller with either of them alternatively you can familiarize yourself with the Video Game Library 2.0 that makes all of this a […]